

Walk into any traditional Irish bakery and you’ll know exactly what to look for. There, on the counter behind the glass, sitting plump and golden in a row, are the cream doughnuts — dusted in caster sugar, filled to bursting with silky custard cream. For generations of Irish children, a trip to the local bakery meant one thing: getting your hands on one of these. Chris from The Irish Baker Abroad grew up with exactly that memory, and his recipe for classic Irish custard cream doughnuts brings every bit of that magic home.
These are enriched yeasted doughnuts — a far cry from the dense, cakey versions you might find elsewhere. The dough is soft and pillowy, made with warm milk, butter, and a good hit of fast-action yeast that gives them their characteristic lightness. The custard filling is a proper crème pâtissière: thick, vanilla-scented, and rich enough to hold its shape when piped into that warm, sugar-coated shell. If you’ve ever wanted to recreate the taste of an Irish bakery at home, this is the recipe to reach for.
Why Irish Cream Doughnuts Are Different
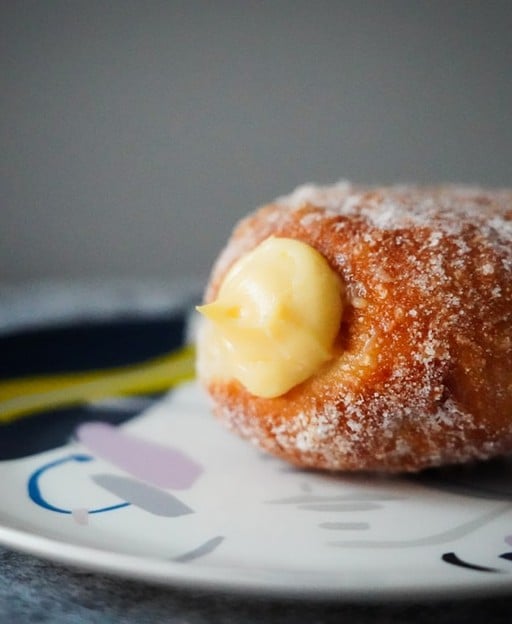
There’s something distinctive about the cream doughnut you find in Irish bakeries. It’s not glazed. It’s not ring-shaped. It’s a smooth, round ball of dough — fried golden, rolled in caster sugar while still warm, and filled through a small hole in the side with a generous amount of cold custard cream. That combination of textures — the faintly crisp, sugary shell, the soft, open crumb, and the cool, silky custard — is uniquely satisfying. It’s comfort food in the truest sense.
Chris describes these as a “childhood memory” and they genuinely are for many people who grew up in Ireland. Whether you picked one up on the way home from school, as a weekend treat, or at a family gathering, the cream doughnut occupies a special place in Irish baking culture. Learning to make them yourself brings that warmth right into your kitchen.
The Key to Light and Fluffy Doughnuts
The most important thing Chris emphasises throughout this recipe is patience with the proving stages. This is an enriched dough — butter and milk slow down the yeast slightly, which means you need to give it proper time to rise. Rush the first or second prove and your doughnuts will be dense and heavy, not the light, airy pillows they should be.
The dough itself is made like many enriched breads: yeast is activated in warm milk with sugar, then flour and salt are added, and finally soft butter is incorporated a little at a time. Kneading for a full 8 to 10 minutes in a stand mixer builds the gluten structure that gives these doughnuts their chew and helps them stay light. After the first prove (an hour to an hour and a half), the dough is divided, shaped into smooth balls, and allowed to prove again for almost another hour before frying.
Chris also uses plain flour in the video, though he notes that strong white bread flour — with its higher protein content — gives an even better result if you have it. Either way, the dough will deliver excellent doughnuts as long as you don’t cut corners on the proving time.
Love Irish baking? You’ll also enjoy our recipe for Traditional Irish Scones — light and fluffy and ready in just 30 minutes.
Making the Custard Cream (Crème Pâtissière)
The filling is a classic crème pâtissière — essentially a thick, set custard made from full-fat milk, egg yolks, caster sugar, flour, and vanilla. It’s not difficult to make, but it does require your full attention at the stove and plenty of patience while it chills.
The custard is best made ahead. Chris recommends chilling it overnight, and with good reason: a properly set crème pâtissière pipes cleanly and holds its shape inside the doughnut without running. If you skip to just a few hours’ chilling, it will still work — but overnight is genuinely worth the extra planning.
Once the custard is cold and firm, a quick whisk restores its silky, smooth consistency before it goes into the piping bag. This step is essential — whisking the cold custard loosens it back to a pipeable consistency without making it runny.
Frying the Doughnuts — Temperature is Everything
Chris is very clear on this point: oil temperature makes or breaks your doughnuts. Too hot and they’ll burn on the outside before the dough is cooked through. Too cool and they’ll absorb excess oil and come out greasy. The target is 170°C (340°F), and a kitchen thermometer is highly recommended if you want consistent results.
Fry in small batches — 2 to 3 at a time — so the oil temperature stays stable. Each doughnut needs 2 to 3 minutes per side, until that characteristic deep golden brown colour develops. Remove them from the oil, let the excess drain for a moment, then roll them immediately in caster sugar while they’re still warm so the sugar adheres properly. Then transfer to a wire rack to cool completely before filling.
This is a project recipe — not a quick weeknight bake — but the result is absolutely worth it. If you enjoy making yeasted doughs, you might also like our guide to making a Classic Bread and Butter Pudding, another beloved Irish comfort dessert from Chris’s collection.
The Full Irish Cream Doughnuts Recipe
This recipe makes 10 doughnuts. The custard cream can be made the night before — in fact, this is the recommended approach for the best results.
For the Doughnuts
- 200ml warm milk (around 38°C — body temperature)
- 50g caster sugar
- 10g fast-action dried yeast
- 350g plain flour (or strong white bread flour)
- 5g salt
- 50g unsalted butter, softened
- 1.5 litres vegetable oil (for frying)
- 50–100g caster sugar (for rolling)
For the Vanilla Custard Cream (Crème Pâtissière)
- 400ml full-fat milk
- 100g caster sugar
- 4 egg yolks
- 1 teaspoon vanilla extract
- 30g plain flour
Method
Make the Custard Cream (best made ahead)
- Heat the milk in a saucepan over medium heat until small bubbles appear around the edges — just below a boil.
- In a heatproof bowl, whisk the egg yolks with the caster sugar until pale and slightly thickened. Whisk in the flour until smooth.
- Slowly pour about half of the hot milk into the egg mixture, whisking continuously (this tempers the eggs). Pour the combined mixture back into the saucepan.
- Return to medium heat and whisk constantly for 2–3 minutes until the custard thickens and comes to a boil. Cook for 1 minute more to cook out the flour.
- Remove from heat, stir in the vanilla, and transfer to a clean bowl. Press cling film directly onto the surface to prevent a skin forming. Refrigerate for at least 2–3 hours, or overnight for the best results.
Make the Doughnut Dough
- In a large bowl (or the bowl of a stand mixer), combine the warm milk, caster sugar, and yeast. Whisk lightly and leave for 5–10 minutes until the mixture is visibly foamy.
- Add the flour and salt. Mix with the dough hook (or by hand) until a rough dough forms, about 1–2 minutes.
- Add the softened butter a little at a time, allowing each addition to be incorporated before adding more.
- Knead on medium speed for 8–10 minutes (or 10–15 minutes by hand) until the dough is smooth, elastic, and pulls away cleanly from the sides of the bowl.
- Shape into a ball and place in a lightly oiled bowl. Cover with cling film and prove in a warm place for 1–1.5 hours until doubled in size.
Shape and Second Prove
- Knock back the dough gently. Turn onto a lightly floured surface and divide into 10 equal pieces (approximately 60–70g each).
- Shape each piece into a smooth ball by tucking the edges underneath and rolling under a cupped hand on the work surface to create surface tension.
- Arrange on lined baking trays with plenty of space between them. Dust lightly with flour, cover loosely, and prove for 45 minutes to 1 hour until noticeably puffy.
Fry and Fill
- Heat the vegetable oil in a large, deep pot to 170°C (340°F). Use a kitchen thermometer to maintain this temperature — it’s crucial for even cooking.
- Gently lower 2–3 proved doughnuts into the oil. Fry for 2–3 minutes per side until deep golden brown. Adjust the heat as needed to keep the oil temperature steady.
- Remove with a slotted spoon, drain briefly, and roll immediately in caster sugar. Transfer to a wire rack and cool completely.
- Once the custard is cold, whisk it vigorously for 30–60 seconds until silky smooth. Transfer to a piping bag fitted with a medium round nozzle.
- Poke a hole in the side of each doughnut with a skewer or the piping nozzle. Wiggle gently to create a cavity inside. Pipe in the custard generously until the doughnut feels heavy and plump.
- Serve fresh on the day they are made.
Tips and Variations
- Flour choice: Strong white bread flour gives a slightly chewier, better-structured doughnut. Plain flour works perfectly well and is what Chris uses in the video.
- Oil temperature: This is the most critical factor. Invest in a kitchen thermometer — even an inexpensive one will transform your frying results.
- Proving time: Don’t rush either prove. Both stages are essential for achieving lightness. If your kitchen is cool, the proves will take a little longer, and that’s fine.
- Custard firmness: An overnight chill gives you the firmest, best-behaved custard for piping. If you’re short on time, 3 hours in the fridge will work, but overnight is always worth it.
- Variation — jam filling: The same dough works brilliantly with a good strawberry or raspberry jam filling instead of custard — a traditional alternative found in many Irish bakeries.
- Gluten-free custard: Replace the flour in the custard with cornflour (cornstarch) for a gluten-free version of the filling.
If you love classic Irish baking, make sure to try our Homemade Apple Pie and the wonderfully indulgent Millionaire Shortbread — both from Chris’s growing collection of Irish bakery favourites.
Here’s Chris walking you through the complete process from start to finish:
☘️ You Might Also Love
☘️ Join 65,000+ Ireland Lovers
Every Friday, get Ireland’s hidden gems, local secrets, and travel inspiration — the kind you won’t find in any guidebook.
Already subscribed? Download your free Ireland guide (PDF)
Love more? Join 43,000 Scotland lovers → · Join 30,000 Italy lovers → · Join 7,000 France lovers →
Free forever · · Unsubscribe anytime
Frequently Asked Questions
Can I make the dough ahead of time?
Yes. After the first prove, you can cover the dough tightly and refrigerate it overnight. The cold will slow the yeast dramatically. The next day, bring the dough back to room temperature (about 1 hour), then divide, shape, and proceed with the second prove and frying.
Why are my doughnuts too dense?
The most common cause is under-proving. If the first or second prove is cut short, the dough won’t have developed enough gas to create a light, airy crumb. Make sure the dough genuinely doubles in size during the first prove, and that the shaped doughnuts look visibly puffy — increased by about half their size — before frying.
Can I bake these instead of frying them?
Baking is possible, but the result is quite different — more like a soft roll than a true doughnut. The characteristic golden, lightly crisp exterior that comes from frying cannot be replicated in the oven. For authentic Irish cream doughnuts, frying is the method to use.
How long do they keep?
Irish cream doughnuts are best eaten fresh on the day they are made. The custard filling and the fried dough both deteriorate in quality overnight. If you do have leftovers, store them in an airtight container in the refrigerator (because of the custard) and consume within 24 hours. Bring them back to room temperature before eating.
A Taste of the Irish Bakery at Home
There’s something deeply satisfying about making a recipe that carries so much nostalgia — and Irish cream doughnuts deliver it in every bite. The light, yeasted dough, the silky custard, the coating of caster sugar: they’re everything you’d hope to find behind the counter of a traditional Irish bakery, made in your own kitchen with simple, wholesome ingredients.
If this recipe has you exploring more of Ireland’s baking heritage, you might love Rock Buns — a classic Irish teatime treat that requires no proving or frying — or the wonderfully satisfying No-Bake Baileys Irish Cream Cheesecake for something a little more indulgent. And if you want to explore the story behind the man who inspired these recipes, visit our page on The Irish Baker Abroad.
Bake them for a weekend treat, bring them to a gathering, or simply enjoy the process of making something truly special from scratch. Once you’ve tasted a freshly made, custard-filled Irish cream doughnut, you’ll understand exactly why they’re so beloved.
Tours & experiences you might love


Powered by Viator. Some links are affiliate links — we may earn a small commission at no extra cost to you.
Secure Your Dream Irish Experience Before It’s Gone!
Planning a trip to Ireland? Don’t let sold-out tours or packed attractions spoil your journey. Iconic experiences like visiting the Cliffs of Moher, exploring the Rock of Cashel, or enjoying a guided walk through Ireland’s ancient past often sell out quickly—especially during peak travel seasons.

Booking in advance guarantees your place and ensures you can fully immerse yourself in the rich culture and breathtaking scenery without stress or disappointment. You’ll also free up time to explore Ireland’s hidden gems and savour those authentic moments that make your trip truly special.
Make the most of your journey—start planning today and secure those must-do experiences before they’re gone!