

There is something deeply satisfying about pulling a tray of perfectly risen scones from the oven. The golden tops, the soft crumb, that little crown of height that tells you everything went just right. Traditional Irish scones are one of those bakes that sounds simple — and it is — but only when you know the handful of techniques that make the difference between a dense, disappointing result and something genuinely light and fluffy. Chris from The Irish Baker Abroad has spent years perfecting this recipe, and in his popular YouTube video he shares every tip and trick that makes his scones unforgettable.
What’s the best Irish dish of all time? ☘️
Vote in our Best Irish Food poll — recipes nominated by the community.
What’s your Irish county’s signature dish? ☘️
Different counties claim different dishes — Your County’s Signature Food tells you which one your county is known for, with a short story behind it.
Whether you are recreating an afternoon tea at home, baking for a Sunday gathering, or simply craving a taste of Ireland in your own kitchen, this recipe will not let you down. It makes 12 to 14 generous scones, takes just 30 minutes from start to finish, and the method is straightforward once you understand why each step matters.
What Makes These Traditional Irish Scones Special
The first thing that sets this recipe apart is the flour. Chris uses strong bread flour rather than plain flour. This is not accidental. Strong bread flour has a higher protein content, which gives the scones a better structure and results in a noticeably more impressive rise. If you have only plain flour to hand, they will still work, but strong flour is the ingredient that takes these scones from good to great.
The second key is cold butter. Cold, cubed butter rubbed into the flour creates tiny pockets of fat that — when they hit the heat of the oven — release steam and push the dough upwards. The technique of lifting your hands high when rubbing in the butter (rather than squeezing at low height) incorporates air into the mixture, which contributes further to that light, open crumb.
Third, and perhaps most importantly, is restraint. Every instinct you have as a baker will tell you to mix more, to knead the dough, to work it until it comes together smoothly. Resist that instinct. Overworking scone dough develops gluten, which makes the scones tough. The dough should look shaggy and rough — that is exactly right. Once it is barely combined, it is done.
And the cutter trick? Similar to good Irish soda bread, it comes down to one seemingly small decision: never twist the cutter. When you press a round cutter into scone dough and twist it, you seal the edges. The dough cannot expand at the sides, so it struggles to rise. Press straight down and lift straight up — every time. The scones will reward you with that beautiful, even crown.
Ingredients
This recipe makes approximately 12 to 14 scones.
- 500g strong bread flour (approx. 4 cups)
- 25g baking powder (approx. 2 tablespoons)
- 50g caster sugar (approx. ¼ cup)
- 5g salt (approx. 1 teaspoon)
- 100g unsalted butter, chilled and cut into small cubes
- 200ml full-fat milk (approx. ¾ cup)
- 1 large egg
- For the egg wash: 1 large egg + a splash of milk (1–2 tablespoons)
A note on measurements: Chris primarily works in grams and millilitres. If you are baking these for the first time, a kitchen scale will give you the most consistent results. Cup measurements are provided as an approximation, but weighing is always more accurate for baking.
Method — Step by Step
☘️ Love Irish Food & Culture?
Every Wednesday, we send our best Irish recipes, food stories, and kitchen traditions straight to your inbox. Join 64,000+ readers who love Ireland.
Step 1: Preheat the Oven
Preheat your fan-assisted oven to 200°C (390°F). If you are using a conventional oven without a fan, set it to 220°C (425°F). A properly preheated oven is essential — scones need to hit immediate, consistent heat to rise properly.
Step 2: Sift and Combine the Dry Ingredients
Sift the strong bread flour into a large mixing bowl. Add the baking powder, caster sugar, and salt. Whisk everything together thoroughly so the raising agent is distributed evenly throughout the flour. This matters more than it might seem — pockets of baking powder will create uneven rising.
Step 3: Rub in the Butter
Add the chilled, cubed butter to the flour mixture. Using your fingertips — not your palms, which are too warm — rub the butter into the flour. Lift your hands up above the bowl as you work, letting the mixture fall back down. This motion traps air in the mixture. Continue until everything looks like coarse breadcrumbs with no visible lumps of butter remaining.
Alternatively, you can use a food processor to pulse the flour and butter together until crumbly. If you do this, be careful not to over-process — pulse briefly, a few seconds at a time, and stop as soon as it reaches the breadcrumb stage.
Step 4: Prepare the Liquid Mixture
In a separate bowl or jug, whisk together the 200ml of full-fat milk with one large egg until thoroughly combined. Using full-fat milk rather than skimmed makes a real difference to richness and flavour here.
Step 5: Bring the Dough Together
Make a well in the centre of your flour and butter mixture. Pour in approximately three-quarters of the milk and egg mixture. Using a table knife or a flat-bladed spatula, mix with light, sweeping movements until the dough begins to come together in rough, shaggy clumps. Do not stir vigorously.
Add more of the liquid mixture gradually if there are still dry patches of flour in the bowl — the dough should be soft and slightly tacky, but not wet or sticky. You may not need all of the liquid.
Step 6: Shape the Dough
Lightly flour your work surface and turn the dough out onto it. Gently bring it together with your hands, pressing very lightly — think of it as coaxing the dough rather than working it. Do not knead. Once it holds together, gently pat or roll it out to a thickness of 3cm (approximately 1.2 inches). This thickness is important: too thin and the scones will not have enough depth to rise impressively.
Step 7: Cut the Scones
Dip a 6cm (approximately 2.5 inch) round cutter into flour before each cut. Press it straight down through the dough and lift it straight back up. Never twist. Place the cut scones onto a baking tray lined with parchment paper, leaving a small gap between each.
Gather the remaining dough scraps gently, press them together with a light touch, and re-roll to 3cm. Cut out any remaining scones from the second roll.
Step 8: Apply the Egg Wash
Whisk together one egg with a splash of milk to make the egg wash. Using a pastry brush, paint the tops of the scones with a thin layer of egg wash. Brush only the tops — be careful to avoid letting the egg wash drip down the sides of the scones. Even a small drip can seal the edge and limit the rise.
Step 9: Bake
Bake in the preheated oven for 12 to 15 minutes, until the scones are beautifully risen and golden brown on top. Every oven is slightly different, so check at the 12-minute mark. A properly baked scone will have a golden crown and feel light when you lift it.
Step 10: Cool and Serve
Transfer the scones to a wire rack and allow them to cool completely before cutting or serving. This is harder than it sounds when your kitchen smells incredible, but cutting a hot scone will make the inside seem dense and doughy. Give them time. The wait is worth it.
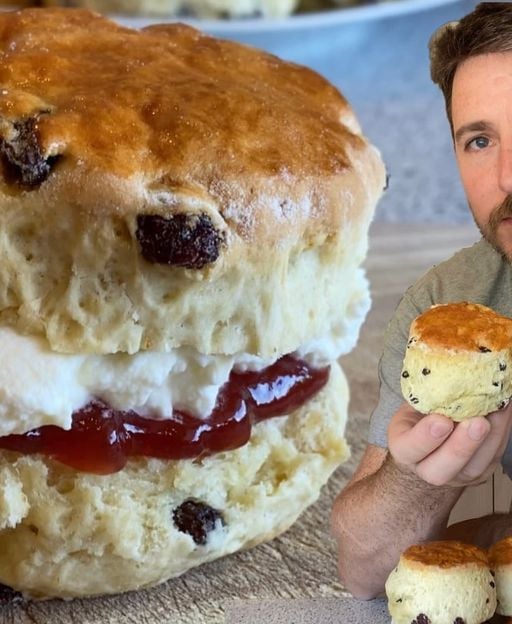
Serve with good jam and clotted cream, or simply a generous spread of Kerrygold butter. Kerrygold is made from the milk of Irish grass-fed cows and it elevates any baked good to another level entirely.
Tips, Tricks, and Variations
Chris shares a number of extra tips in the video that are worth keeping in mind every time you make this recipe:
- Keep everything cold. Warm butter, warm hands, a warm kitchen — all of these work against you. If your kitchen is particularly warm, briefly chill the mixing bowl before you start.
- Strong flour is worth seeking out. If your local supermarket does not stock strong bread flour in the baking aisle, try a specialist food shop or order online. The difference is noticeable.
- Do not skip the sifting. Sifting the flour aerates it and helps the baking powder distribute evenly.
- The dough should look rough. A smooth, well-mixed scone dough is actually overworked scone dough. Shaggy is good.
- Flour the cutter before every cut. A clean, sharp cut gives you the best rise.
- Re-rolling scraps: The second-roll scones will not rise quite as dramatically as the first-roll ones, simply because the dough has been handled more. They will still be delicious.
Adding fruit: If you would like to make fruit scones — a very traditional Irish variation — add sultanas, raisins, or dried cranberries to the dry ingredients after rubbing in the butter, but before adding the liquid. About 75g of dried fruit works well. This is how many Irish households have always made their scones, and the sweetness of the dried fruit pairs beautifully with a scraping of butter.
This same dough adapts beautifully to other additions. If you enjoyed Chris’s Cheese and Spring Onion Scones, you can see how the basic scone method adapts to savoury flavours by omitting the sugar and adding cheese and fresh onion instead.
About The Irish Baker Abroad
Chris Fisher — known online as The Irish Baker Abroad — is an Irish baker who shares traditional and contemporary baking recipes through his popular YouTube channel. What makes his content so valuable is the way he explains not just what to do, but why each step matters. He has built a loyal following of home bakers across the world who appreciate his no-nonsense, practical approach and his deep respect for traditional Irish baking.
We have been featuring his recipes on Love Ireland for a number of years now, and each one is a reminder of how rich Irish food culture really is. From his classic apple pie to his extraordinary Chocolate Guinness Cake, Chris’s recipes are reliable, tested, and deeply rooted in Irish tradition.
Watch Chris Make These Scones
There is something uniquely useful about watching a baking video, particularly for techniques like rubbing in butter or judging the consistency of scone dough. Below is Chris’s full video showing exactly how these traditional Irish scones come together:
☘️ You Might Also Love
☘️ Join 65,000+ Ireland Lovers
Every Friday, get Ireland’s hidden gems, local secrets, and travel inspiration — the kind you won’t find in any guidebook.
Already subscribed? Download your free Ireland guide (PDF)
Love more? Join 43,000 Scotland lovers → · Join 30,000 Italy lovers → · Join 7,000 France lovers →
Free forever · · Unsubscribe anytime
Frequently Asked Questions
Can I use plain flour instead of strong bread flour?
Yes, plain flour will work in a pinch, but the scones will not rise quite as high or have the same light texture. Strong bread flour has a higher protein content, which creates more structure and gives these scones their signature height. If you can get strong flour, it is worth it.
Why shouldn’t I twist the cutter?
Twisting the cutter compresses and seals the edges of the dough, preventing the scone from expanding upwards as it bakes. By pressing straight down and lifting straight up, you leave the edges free to rise, which is how you get that beautiful, tall, well-risen scone. It is one of the most impactful single tips in the whole recipe.
Can I make the dough ahead of time?
Scone dough is best baked immediately after mixing. If you need to prepare ahead, you can cut the scones and refrigerate them unbaked for up to an hour before baking. Alternatively, bake the scones, allow them to cool fully, and freeze them — they reheat beautifully in a low oven for 10 minutes from frozen.
What is the best way to serve traditional Irish scones?
The classic Irish way is with good jam — raspberry or strawberry are both traditional — and clotted or whipped cream. In Ireland, the debate about whether the cream or jam goes on first is considerably less heated than the equivalent discussion in England, where it can prompt genuine controversy depending on whether you are in Devon or Cornwall. In an Irish home, you simply put whatever you like on first and get on with enjoying it. A strong cup of tea alongside is non-negotiable.
More Traditional Irish Baking to Try
If you have enjoyed this scone recipe, here are some other traditional Irish bakes from Love Ireland’s collection that you might love:
- Traditional Irish Soda Bread — Easy Home Recipe
- Irish Tea Brack — A Classic for Any Occasion
- Millionaire Shortbread — Chris’s Caramel Classic
- Raisin Scones from the Irish Baker Abroad
- Homemade Apple Pie — The Irish Baker Abroad Recipe
Traditional Irish baking is one of the quiet glories of Irish food culture — humble, practical, and deeply comforting. Whether you are making these scones for a Sunday afternoon at home or sending a recipe link to someone who loves Ireland and misses the taste of it, we hope this brings a little warmth to your kitchen.
☘️ Get More Irish Recipes & Stories
Join 64,000+ readers for weekly Irish recipes, food traditions, travel guides, and hidden gems. Free every morning.
Tours & experiences you might love


Powered by Viator. Some links are affiliate links — we may earn a small commission at no extra cost to you.
Secure Your Dream Irish Experience Before It’s Gone!
Planning a trip to Ireland? Don’t let sold-out tours or packed attractions spoil your journey. Iconic experiences like visiting the Cliffs of Moher, exploring the Rock of Cashel, or enjoying a guided walk through Ireland’s ancient past often sell out quickly—especially during peak travel seasons.

Booking in advance guarantees your place and ensures you can fully immerse yourself in the rich culture and breathtaking scenery without stress or disappointment. You’ll also free up time to explore Ireland’s hidden gems and savour those authentic moments that make your trip truly special.
Make the most of your journey—start planning today and secure those must-do experiences before they’re gone!