

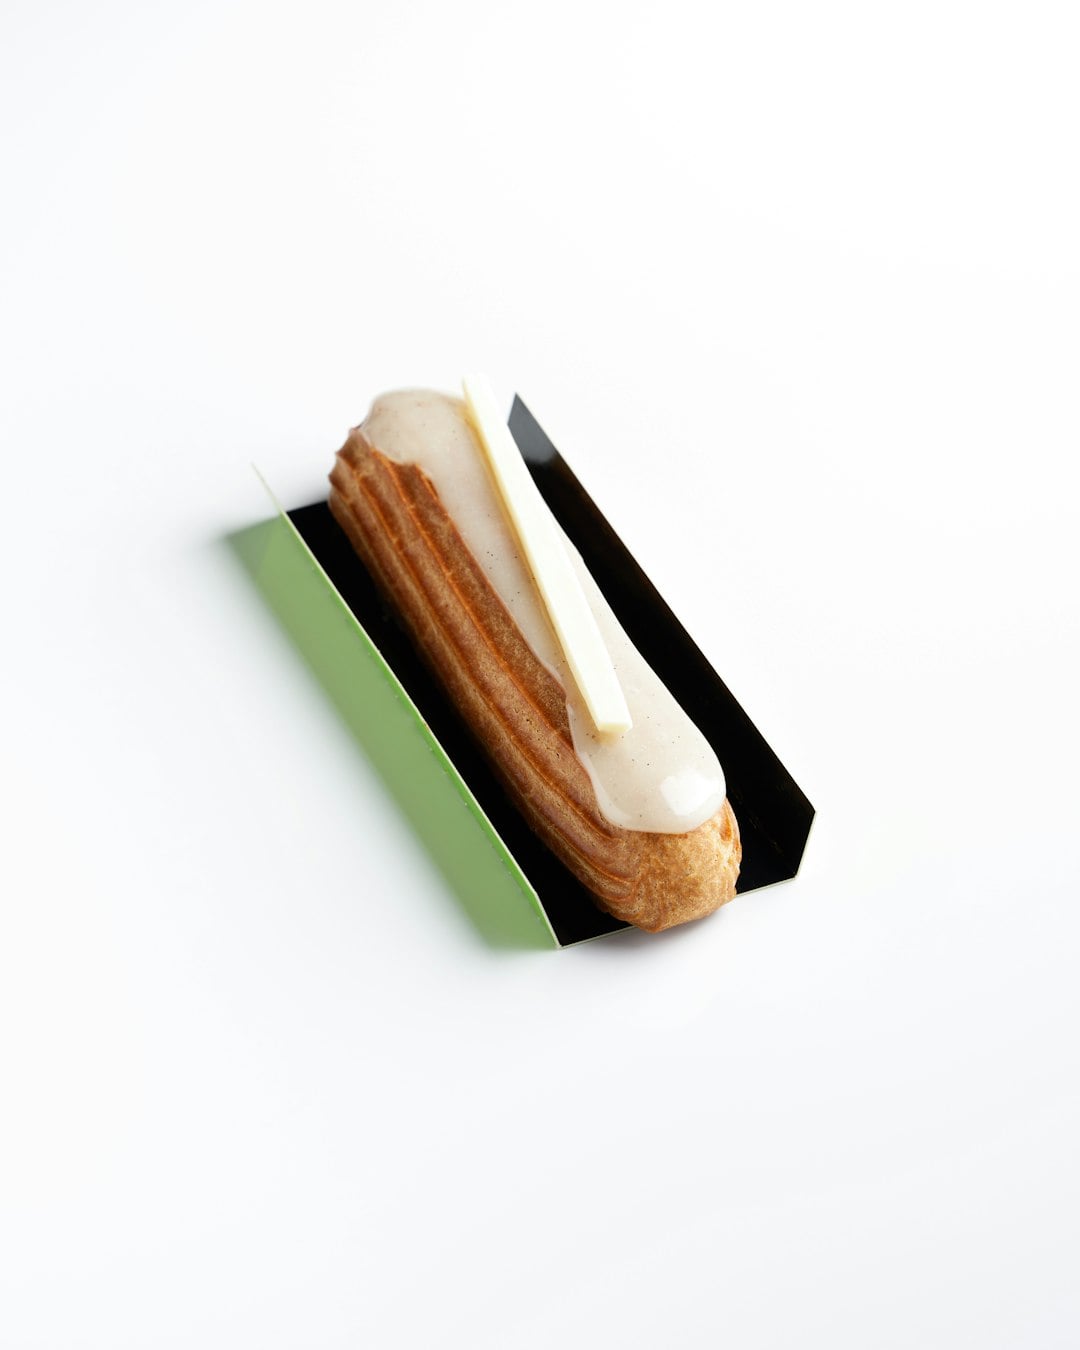
There is one pastry that looks impossibly elegant and yet uses just four ingredients. Choux pastry. Crisp on the outside, hollow in the middle, and ready to fill with whatever your heart desires. If you have ever wanted to make éclairs at home, this recipe is your starting point.
Chris from The Irish Baker Abroad has built a loyal following by making classic bakes feel achievable. His choux pastry tutorial is exactly that — calm, clear, and full of the kind of detail that actually makes a difference. Watch him work through each stage and you will understand why this pastry has a reputation for being tricky. Done right, it is anything but.
Why Choux Pastry Is Different From Any Other Dough
Most pastries use fat and flour together from the start. Choux pastry does not. You boil water and butter first. Then you add flour directly into the boiling liquid. That flash of heat cooks the starch in the flour immediately. This creates a paste rather than a crumble — and that paste is what gives choux its unique structure.
When the paste goes into the oven, the water inside turns to steam. That steam expands rapidly and puffs the pastry outward. The result is a hollow shell. No yeast. No rising agent. Just physics doing the work.
This is why choux pastry is used for éclairs, profiteroles, and cream puffs. The hollow centre is the point. It is a built-in pocket waiting to be filled.
Chris focuses on éclairs in this video. He pipes the choux into long fingers, bakes them until golden, and demonstrates the exact technique that prevents the two most common failures: éclairs that go flat and éclairs that go soggy. Both are avoidable once you know what to look for.
The Ingredients You Need
Four ingredients. That is all choux pastry requires. There is nowhere to hide, which means each one matters.
- Water — 250 ml. The liquid that creates the steam. Use cold tap water.
- Butter — 125g. Unsalted works best. Cut into cubes for even melting.
- Plain flour — 125g. Sifted. No self-raising flour — you do not want extra lift here.
- Eggs — 3 large (approximately 150g total, around 50g each after cracking). These add richness and help the paste hold its shape when piped.
That is it. Four ingredients. The technique is where choux pastry lives or dies.
How to Make Choux Pastry — Step by Step
Follow these steps carefully. Read them through once before you begin. The process moves quickly once you add the flour.
Step 1 — Make the Paste
Combine the water and butter in a medium saucepan. Place over medium heat. Bring to a full rolling boil. Make sure the butter is completely melted before it boils.
Step 2 — Add the Flour
Remove the pan from the heat immediately. Add all the flour at once. Stir vigorously with a wooden spoon. Keep stirring until the flour is fully absorbed and a smooth paste forms. There should be no dry patches. Work quickly — this only takes about a minute.
Step 3 — Dry the Paste on the Hob
Return the pan to medium heat. Stir the paste constantly. You are drying it out. Cook for 2–3 minutes. The paste is ready when it pulls away cleanly from the sides of the pan and forms a smooth ball. Do not skip this step. Wet paste leads to soggy éclairs.
Step 4 — Cool the Paste
Tip the paste onto a clean plate. Spread it out into a thin layer. This helps it cool faster. Cover with cling film. Leave for about 15 minutes. The paste should be warm, not hot, before you add the eggs. If the paste is too hot, it will scramble the eggs. Patience here pays off.
Step 5 — Add the Eggs
Crack the eggs into a small bowl. Beat them lightly with a fork. Transfer the cooled paste to the bowl of a stand mixer fitted with the whisk attachment. Start the mixer on the slowest speed. Add the beaten egg gradually — a small splash at a time. Wait for each addition to incorporate fully. Do not rush this stage. Once all the egg is in, increase the speed to medium-high. Beat for about one minute. The finished paste should be smooth, shiny, and thick enough to hold a shape when piped.
Step 6 — Pipe the Éclairs
Fit a piping bag with a French star tip. Fill the bag with the choux paste. Line a baking tray with parchment paper. Pipe éclairs about 13 cm long. Hold the bag at a 45-degree angle. Keep the pressure steady throughout each éclair. Consistent thickness means even baking.
Step 7 — Bake
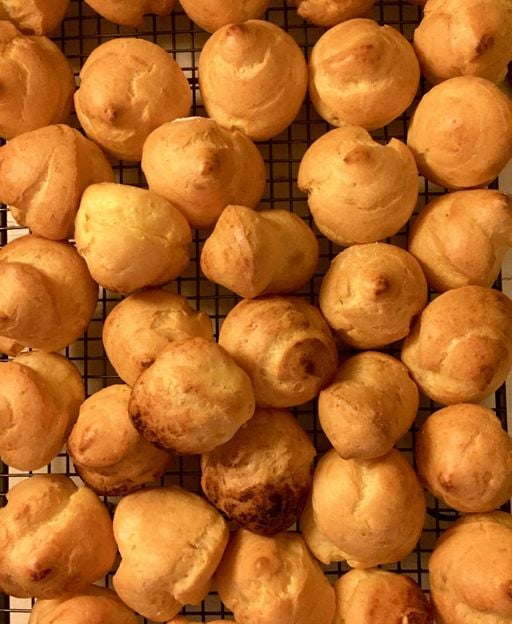
Preheat the oven to 200°C. Slide the tray into the oven. Bake for 30–35 minutes. The éclairs should be golden brown and puffed when ready. Do not open the oven door during baking. The steam inside needs to stay contained.
Step 8 — Release the Steam
Remove the tray from the oven. Use a small knife to prick the end of each éclair immediately. This lets the trapped steam escape. Turn the oven off. Return the éclairs to the warm oven for another 5 minutes. This final drying stage is what keeps them crisp. It is the step most people miss — and it makes all the difference.
Step 9 — Cool and Fill
Transfer the éclairs to a wire rack. Leave to cool completely. Fill with pastry cream, whipped cream, or any filling you love. Top with chocolate glaze or fondant icing. Serve the same day for the best texture.
Chris’s Tips for Perfect Choux Every Time
Chris addresses the two most common problems directly: flat éclairs and soggy éclairs. Here is what causes them and how to avoid both.
Why Éclairs Go Flat
Flat éclairs usually mean the paste was not mixed thoroughly enough after adding the eggs. After all the egg is incorporated, beat the paste for a full minute on medium-high speed. The mixture should be smooth and glossy with no lumps. If it looks grainy or dull, keep mixing.
Why Éclairs Go Soggy
Soggy éclairs happen when moisture is not properly removed. Two things cause this. First, underdrying the paste on the hob — cook until it pulls away cleanly from the pan sides. Second, skipping the post-bake steam release — always prick and return to the oven for 5 minutes.
Bake One Tray at a Time
If you have more than one tray, bake them separately. Too much moisture in the oven at once leads to uneven results. Take the extra time. It is worth it.
The Egg Temperature Rule
Do not add eggs to paste that is still very hot. It will cook the eggs and ruin the texture. Always cool the paste for at least 15 minutes first. A little warmth is fine — it actually helps the eggs incorporate smoothly.
Mixer Attachment Options
Chris uses the whisk attachment, but a paddle attachment works too. Either will give you the smooth, shiny paste you are looking for.
What to Fill Your Éclairs With
The classic French filling is crème pâtissière — a thick, silky vanilla custard that pipes into the hollow shell beautifully. But choux pastry is remarkably versatile. Here are some ideas to get you started.
- Vanilla pastry cream — the traditional choice. Rich, smooth, and a little indulgent.
- Whipped cream — lighter and simpler. A good choice if you are serving them immediately.
- Irish cream liqueur cream — whip double cream with a splash of Baileys for a decidedly Irish twist.
- Lemon curd — tart and bright. Pairs beautifully with white chocolate on top.
- Caramel cream — fold salted caramel sauce into whipped cream for a rich, indulgent filling.
For the topping, dark chocolate glaze is the classic match for éclairs. Melt 100g of dark chocolate with a tablespoon of cream. Dip the top of each éclair directly into the glaze and leave to set. Clean, elegant, and deeply satisfying.
When to Make Choux Pastry
Éclairs made from scratch are a genuine treat. They suit celebrations, afternoon tea, or simply a weekend afternoon when you want to try something new. The shells can be made a few hours ahead and stored uncovered at room temperature. Fill them just before serving for the best texture.
Choux pastry also forms the base of profiteroles — the round puffs often served in towers with chocolate sauce at Irish celebrations and dinner parties. Once you master the basic paste, you can pipe it into rounds as easily as fingers. The technique is identical.
If you enjoy baking with a classic Irish feel, have a look at some other traditional recipes on Love Ireland — from authentic Irish soda bread to chocolate éclairs with vanilla cream and dark chocolate glaze. Irish baking covers a wide range — from humble soda bread to these elegant pastry shells — and every one of them is worth learning.
About The Irish Baker Abroad
Chris from The Irish Baker Abroad shares his baking passion from outside Ireland, bringing classic recipes to home bakers all over the world. His style is warm and practical — he explains what can go wrong, why it happens, and how to fix it. No fuss, no shortcuts. Just honest baking instruction with a genuine love for the craft.
Watch the full choux pastry tutorial below and bake along with Chris step by step.
☘️ Join 65,000+ Ireland Lovers
Every Friday, get Ireland’s hidden gems, local secrets, and travel inspiration — the kind you won’t find in any guidebook.
Subscribe free — enter your email:
Already subscribed? Download your free Ireland guide (PDF)
Love more? Join 43,000 Scotland lovers → · Join 30,000 Italy lovers → · Join 7,000 France lovers →
Free forever · · Unsubscribe anytime
Frequently Asked Questions
Can I make choux pastry without a stand mixer?
Yes. Beat the eggs in by hand using a wooden spoon, adding a small amount at a time. It takes more effort but gives the same result. The paste should be smooth and shiny before you pipe it.
Why did my éclairs turn out flat?
Flat éclairs usually mean the paste was not beaten long enough after adding the eggs. Beat for a full minute on medium-high speed after all the egg is incorporated. The mixture should look smooth and glossy, not rough or grainy.
Can I freeze choux pastry shells?
Yes. Bake the shells fully and cool completely. Place in a freezer bag and freeze for up to one month. Reheat from frozen in a 180°C oven for 5–8 minutes to crisp them up. Fill once cooled.
What is the difference between éclairs and profiteroles?
They use the same choux paste. Éclairs are piped into long fingers. Profiteroles are piped into small rounds. The baking time and technique are identical. Once you master one, you can make the other without any changes to the recipe.
More Irish Baking Recipes to Try
If this choux pastry recipe has sparked your enthusiasm for Irish baking, there is plenty more to explore. Try Chris’s method for classic Irish apple tart — a timeless weekend bake that fills the kitchen with the scent of stewed apple and cinnamon. Or have a go at Waterford Blaas — the soft, floury morning rolls that are one of Ireland’s most beloved bread traditions.
Ireland’s baking tradition is richer than most people realise. From soda bread to choux pastry, from porter cake to Swiss roll, there is a world of recipes worth exploring. Start with the classics and go from there. One bake leads naturally to the next.
Recipe demonstrated by Chris from The Irish Baker Abroad. Watch the full tutorial on YouTube.
Thinking about it seriously?
If you’ve started actually planning a move, our complete the full Move to Ireland guide walks through every step, every cost, and the paperwork that catches most people out.
Tours & experiences you might love


Powered by Viator. Some links are affiliate links — we may earn a small commission at no extra cost to you.
Secure Your Dream Irish Experience Before It’s Gone!
Planning a trip to Ireland? Don’t let sold-out tours or packed attractions spoil your journey. Iconic experiences like visiting the Cliffs of Moher, exploring the Rock of Cashel, or enjoying a guided walk through Ireland’s ancient past often sell out quickly—especially during peak travel seasons.

Booking in advance guarantees your place and ensures you can fully immerse yourself in the rich culture and breathtaking scenery without stress or disappointment. You’ll also free up time to explore Ireland’s hidden gems and savour those authentic moments that make your trip truly special.
Make the most of your journey—start planning today and secure those must-do experiences before they’re gone!
Subscribe Free