

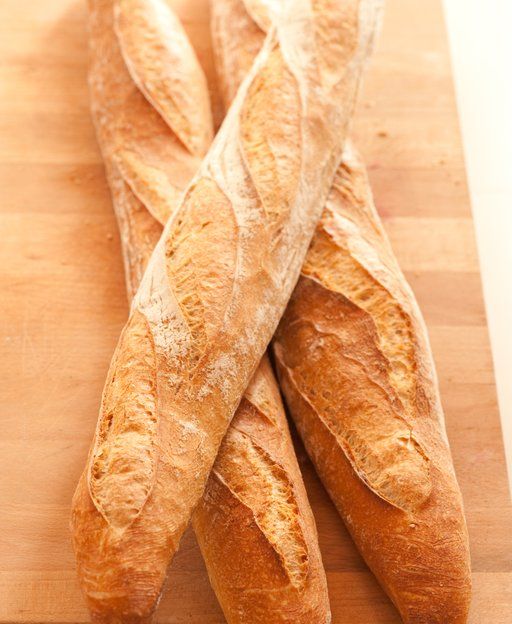
There are few things in life more satisfying than pulling a tray of golden, crackling baguettes from the oven. That unmistakable aroma, the shattering crust, the airy open crumb — it’s the kind of bread that makes you feel like a proper artisan baker, even if you’ve never set foot inside a French patisserie. Chris from The Irish Baker Abroad has cracked the code on making these iconic loaves at home, and with his warm, encouraging teaching style, you’ll be wondering why you ever bought supermarket bread in the first place.
Chris’s recipe relies on a technique beloved by professional bakers: the poolish — a wet pre-ferment made the night before. This one step transforms an ordinary loaf into something extraordinary, developing complex flavour and that characteristic open crumb that sets a great baguette apart from a mediocre one. Don’t let the overnight step put you off; the actual hands-on time is minimal, and the reward is absolutely worth the planning ahead.
What Makes a Great Baguette — And Why the Poolish Matters
The poolish is the heart of this recipe. Made by combining flour, water, and just a small amount of yeast and left to slowly ferment in the fridge overnight, it creates a wealth of flavour-developing activity before you even start on the main dough. The result is a deeper, more complex taste — subtle, slightly tangy notes that you simply cannot achieve with a straight dough method. It also improves the crumb structure, giving you those beautiful irregular holes that bread enthusiasts dream about.
The second secret to Chris’s success is the slap and fold technique. High-hydration doughs like this one are notoriously sticky and can feel almost impossible to knead in the traditional sense. Slap and fold solves this elegantly: you lift the dough, let it slap down onto a lightly wetted surface, and fold it over itself repeatedly. This builds the gluten structure that gives the baguette its chewy, satisfying bite without over-working the dough. As Chris says, “Let the dough do the work for you.” It’s a mantra worth adopting in all your bread baking.
Finally, the oven setup matters enormously. A pizza stone preheated at 230°C for at least 45 minutes, combined with a burst of steam from a glass of water thrown onto the oven floor, replicates the deck oven conditions of a professional bakery. The steam keeps the crust soft in the first few minutes of baking, allowing the baguette to expand fully before setting into that shattering, golden shell. It’s a simple trick that makes a dramatic difference.
Full Recipe: Homemade French Baguettes with Poolish
Makes: 6 baguettes (approx. 300g each)
Hands-on time: Approx. 1.5–2 hours
Fermentation time: 10+ hours (overnight for poolish) + 1 hour 40 minutes for the main dough
Bake time: 18 minutes per batch
Oven temperature: 230°C (446°F)
Ingredients
For the Poolish (make the night before)
- 450g water
- 300g strong bread flour (12–14% protein)
- 4g dry yeast (or 12g fresh yeast)
For the Main Dough
- 320g water
- All of the prepared poolish (from above)
- 750g strong bread flour (12–14% protein)
- 14g salt
Method
Part 1: Making the Poolish (the night before)
- Activate the yeast: In a large metal bowl, whisk 4g of dry yeast into 450g of water until evenly dispersed.
- Add the flour: Add 300g of strong bread flour and whisk until you have a smooth, lump-free batter.
- Cold ferment: Cover the bowl tightly with cling film and place it in the fridge for at least 10 hours, or overnight. By morning, the poolish should be active, bubbly, and fragrant.
Part 2: Making the Main Dough
- Combine wet ingredients: Pour 320g of water into a large mixing bowl. Add all of the prepared poolish and stir to combine.
- Add dry ingredients: Add 750g of strong bread flour and 14g of salt. Using a sturdy spoon or spatula, mix until a shaggy dough forms, scraping down the sides as you go.
- First rise: Cover the bowl with a freezer bag or cling film and leave in a warm spot for 40 minutes.
- Slap and fold: Wet your work surface lightly with water — this prevents sticking without adding extra flour. Wet your hands and turn the dough out. Perform the slap and fold technique for 1–2 minutes, lifting the dough and slapping it down whilst folding it over itself. This builds gluten strength beautifully.
- Second rise: Return the dough to the bowl, cover, and leave for another 40 minutes.
Part 3: Shaping and Final Proof
- Divide: Lightly flour your work surface and turn out the dough. Using a dough scraper and kitchen scales, divide into 6 equal pieces of approximately 300g each.
- Pre-shape: Gently knock back each piece, fold the sides in towards the centre, and roll into a short log. Lightly flour, cover with cling film, and rest for 15 minutes.
- Prepare your couche: Lay a clean tea towel on your work surface and generously flour it using a fine sieve. This floured towel will support the baguettes during their final proof.
- Final shape: Take one pre-shaped piece, gently flatten it, fold the sides into the centre, seal the seam firmly, then roll and stretch gently to your desired baguette length. Place seam-side up on the floured couche. Fold the towel between baguettes to support them and prevent spreading. Repeat for all six.
- Final proof: Cover with another clean tea towel and leave to proof for 45–50 minutes in a warm spot until visibly puffed and tender to the touch.
Part 4: Baking
- Preheat the oven: At least 45 minutes before you intend to bake, heat your oven to 230°C (446°F) with a pizza stone (or heavy baking tray) inside. You want everything screaming hot.
- Score and transfer: Carefully transfer the proofed baguettes onto a lightly oiled baking tray, seam-side down. Using a lame or very sharp blade, make a series of deep, overlapping diagonal slashes along each baguette.
- Bake with steam: Slide the tray onto the hot pizza stone in the oven. Immediately throw a small glass of water onto the oven floor (not the baguettes themselves) to create a burst of steam. Close the oven door quickly. Bake for approximately 18 minutes until deep golden brown and hollow-sounding when tapped.
- Cool: Transfer to a wire rack and leave to cool before slicing. That initial crackle as they cool is one of the most satisfying sounds in baking.
Chris’s Tips for Baguette Success
Chris packs the video with practical advice that makes all the difference between a good baguette and a brilliant one:
- Use the right flour: Strong bread flour with 12–14% protein content is non-negotiable. The high protein level is what develops the gluten network needed for that chewy, structured crumb. All-purpose flour won’t give you the same result.
- Don’t skip the pizza stone: The intense, even heat of a preheated stone replicates a professional baker’s deck oven. If you don’t have one, a heavy cast-iron baking tray inverted in the oven is the next best thing.
- Wet your hands, not the dough: When handling this high-hydration dough, use water on your hands and work surface rather than flour. Adding extra flour at this stage would alter the hydration and affect the final texture.
- Trust visual cues over timing: Chris notes that proofing times can vary depending on the temperature of your kitchen. The baguettes are ready when they look puffed and spring back slowly when gently pressed — not when the clock says so.
- The steam is essential: Don’t skip the water-in-the-oven trick. Without steam in the first minutes of baking, the crust sets too quickly and the baguette can’t expand properly. Steam is what gives you that gorgeous, crackling crust.
Chris’s approach to this recipe is very much in the spirit of his other baking tutorials on the channel — methodical, reassuring, and full of practical wisdom that comes from genuine hands-on experience. Whether you’ve been following his puff pastry guide, tried his Irish batch loaf, or baked along with his no-knead dinner rolls, you’ll find the same reliable, approachable teaching style throughout.
Watch Chris Make Homemade French Baguettes
Frequently Asked Questions
Can I make French baguettes without a pizza stone?
Yes — a heavy cast-iron skillet or a thick baking tray, inverted and preheated in the oven for at least 45 minutes, can substitute for a pizza stone. The key is getting as much thermal mass as possible in the oven so the base of your baguettes gets an intense blast of heat the moment they go in.
Why does my baguette crust go soft after baking?
A crust that softens after baking usually means there was either insufficient steam in the oven during baking, the oven temperature wasn’t hot enough, or the baguettes weren’t baked for long enough. Make sure your oven is at a full 230°C and fully preheated before the baguettes go in. The steam step is crucial — without it, the crust sets before it can fully expand, resulting in a thicker, less crisp shell.
Can I freeze homemade baguettes?
Absolutely. Let the baguettes cool completely, then wrap them individually in cling film and freeze for up to one month. To refresh, place the frozen baguette directly in a hot oven (200°C) for 10–12 minutes — it will emerge almost as good as fresh from the oven. Avoid slicing before freezing if you can, as whole baguettes freeze better.
What is poolish and why does it improve baguettes?
Poolish is a wet pre-ferment made with equal weights of flour and water plus a small amount of yeast, left to slowly ferment (typically overnight in the fridge). During this long, cold fermentation, the yeast and naturally occurring bacteria develop organic acids and flavour compounds that a direct dough simply doesn’t have time to produce. The result is a baguette with more complex flavour, better aroma, a more open crumb structure, and a longer shelf life.
Bring a Little Parisian Magic to Your Kitchen
There’s something deeply rewarding about making bread that would be perfectly at home in a Parisian boulangerie — and doing it in your own kitchen, with your own hands. Chris’s French baguette recipe proves that with the right technique and a little patience for that overnight poolish, world-class bread is well within anyone’s reach.
If this recipe has inspired you to explore more of Chris’s baking adventures, you might also enjoy his classic Irish Christmas Cake, his indulgent Millionaire Shortbread, or his deeply satisfying Chocolate Guinness Cake. Each recipe comes with the same warm, encouraging approach that makes baking feel genuinely accessible — no matter your experience level.
Ireland has a rich baking tradition, and at Love Ireland, we love celebrating the bakers — both at home and abroad — who keep those traditions alive while bringing new skills and inspiration into Irish kitchens. Happy baking!
☘️ You Might Also Love
64,000 Ireland lovers can’t be wrong.
Every week, our free newsletter delivers hidden gems, seasonal guides, local stories, and practical travel tips — straight to your inbox. Join the community that loves Ireland as much as you do.
FREE GUIDE: 25 Hidden Gems of Ireland That Most Tourists Never Find (PDF)
☘️ Want More Hidden Ireland?
Join 64,000+ subscribers who discover Ireland’s best-kept secrets every week.
Subscribe Free — Join the Community →
Free forever · Unsubscribe anytime · No spam
📥 Free Download: Ireland Travel Planning Guide
Our most popular resource — itineraries, insider tips, and the 50 places you must not miss.
Tours & experiences you might love


Powered by Viator. Some links are affiliate links — we may earn a small commission at no extra cost to you.
Secure Your Dream Irish Experience Before It’s Gone!
Planning a trip to Ireland? Don’t let sold-out tours or packed attractions spoil your journey. Iconic experiences like visiting the Cliffs of Moher, exploring the Rock of Cashel, or enjoying a guided walk through Ireland’s ancient past often sell out quickly—especially during peak travel seasons.

Booking in advance guarantees your place and ensures you can fully immerse yourself in the rich culture and breathtaking scenery without stress or disappointment. You’ll also free up time to explore Ireland’s hidden gems and savour those authentic moments that make your trip truly special.
Make the most of your journey—start planning today and secure those must-do experiences before they’re gone!